Using the Designer
Let’s add a design surface to our new project.
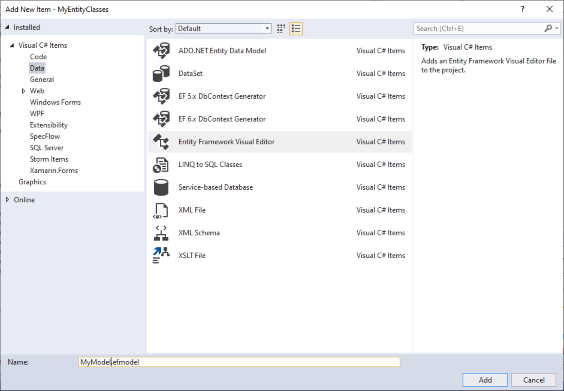
- Right-click the project root and select Add/New Item… from the dropdown menu.
- Find the Data folder under Visual C# Items in the tree to the left and select Entity Framework Visual Editor from the list.
- Name the file to your liking. The name of the file will become the default name of the generated DbContext, though you can change that later. For our example we’ll call it MyModel.
- Click Add.
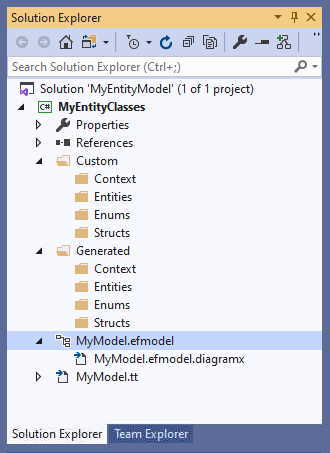
Three files will be added to your project: MyModel.efmodel, MyModel.efmodel.diagramx and MyModel.tt
- The .efmodel file holds the details of your design
- The .efmodel.diagramx file holds the details of the visual representations of your design, defining what you see on the screen
- The .tt file is a T4 template, the entry point into code generation. Other T4 templates were installed, but those are in a common location where your Visual Studio extensions reside
Should you decide to rename these files later, it’s important that the file names stay in sync. In fact, if you do rename them, you’ll need to make a manual edit to the .tt to let it know the name of the .efmodel file, since it needs to find that when you want to generate code. That’s in line 13 of the .tt file (line 17 for legacy projects), but we’ll talk more about that later.
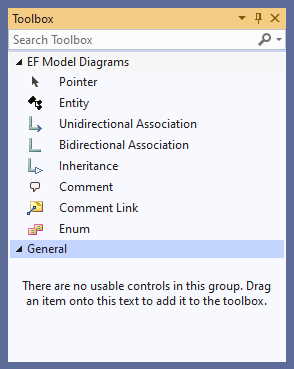
Open the .efmodel file and – so exciting! – you’re presented with a blank screen. No worries – this is where you’ll model your classes. In your toolbox, you’ll see various items that can be added to model.
- Entity : A persistent class
- Unidirectional Association : A navigation property that only goes one way. The starting class will have a property of the type of the ending class (or a collection of them, depending on cardinality), but not the other way around.
- Bidirectional Association : A navigation property that will create properties in classes on both ends.
- Inheritance : Standard .NET inheritance (and its associated constraints). Start the line at the derived class and point to the base class
- Comment : Add a comment box anywhere on the model
- Comment Link : Link an existing comment to an Entity or Enum. Not required since comments can be free-floating, but nice to have if the comment refers to something specific on the diagram.
- Enum : An enumeration
Design Surface Properties
A peek at the Property page when you have the design surface selected (the background, rather than anything on it), shows the properties pertinent to the model itself and the DbContext class you’ll generate. These are as follows:
| Property | Description |
|---|---|
| Code Generation | |
| Chop Method Chains | Boolean. If true, will chop (and align on dot) long method chains in the generated code |
| Context Base Class | String. Name of the base class for your context. Should be fully qualified if it's not DbContext (the default). |
| Default Collection Class | String. The type of container generated for associations (if not overridden). Must implement ICollection<T>. |
| Default Identity Type | String. Default type for ID properties in new classes. Valid values are 'Int16', 'Int32', 'Int64', 'Byte' and 'Guid' |
| Entity Framework Package Version | String. The numeric version of Entity Framework to use (see Entity Framework Version immediately below), or "Latest" to use the most recent. Drives code generation. |
| Entity Framework Version | String. Version of Entity Framework for generated code. Values are currently 'EF6' and 'EFCore' |
| Expose Foreign Keys | Boolean. If true, you'll be allowed to (but are not required to) specify foreign key properties for associations. For real domain-driven design, you really don't want to do this. But we understand that sometimes you're forced to. We understand, but are sad. |
| File Name Marker | String. The text appended to the entity name for generated files. E.g., if set to "generated" (the default), files will be named "MyClass.generated.cs", "MyDbContext.generated.cs", etc. If you have more than one model in a project, it's a good idea to have different markers for each model; the designer tries to clean up unused files, and it uses the marker names to determine what it created earlier. |
| Generate Code on Save | Boolean. If true, will run Visual Studio's Transform All Templates command when the model is saved |
| Inheritance Strategy | String. How tables will be created/used to handle inheritance. Values are "TablePerConcreteType", "TablePerHierarchy" and "TablePerType". See Implementing Inheritance with the Entity Framework 6 in an ASP.NET MVC 5 Application and Inheritance - EF Core with ASP.NET Core MVC tutorial |
| Lazy Loading Enabled | Boolean. If true, entity container will allow lazy loading. See DbContextConfiguration.LazyLoadingEnabled Property |
| Namespaces | |
| DbContext Namespace | String. Default namespace for DbContext-related elements. Can be overridden on a element-by-element basis. |
| Entity Namespace | String. Default namespace for all generated classes. Can be overridden on a element-by-element basis. |
| Enum Namespace | String. Default namespace for all generated enums. Can be overridden on a element-by-element basis. |
| Struct Namespace | String. Default namespace for all generated structs. Can be overridden on a element-by-element basis. |
| Output Locations | |
| Output Directory - DbContext | String. The project directory for generated DbContext-related files. Directory must already exist. |
| Output Directory - Entity | String. The project directory for generated Entity files. Directory must already exist. |
| Output Directory - Enum | String. The project directory for generated enumeration files. Directory must already exist. |
| Output Directory - Struct | String. The project directory for generated dependent type (complex/owned type) files. Directory must already exist. |
| Proxy Generation Enabled | Boolean. If true, context will generate proxies for POCO entities. See DbContextConfiguration.ProxyCreationEnabled Property. |
| Database | |
| Automatic Migrations Enabled | Boolean. If true, code will allow automatic database migrations to be run when changes are detected. See DbMigrationsConfiguration.AutomaticMigrationsEnabled Property. |
| Concurrency Default | String. Default concurrency handling strategy. Values are 'Optimistic' and 'None'. See Handling Concurrency with the Entity Framework 6 in an ASP.NET MVC 5 Application. |
| Connection String | String. Connection string to use as the default connection string for the DbContext. You can call up the connections string dialog here and build the string so you don't have to remember the syntax. Mutually exclusive with Connection String Name |
| Connection String Name | String. Name of connection string in host application config file to use as the default connection string for the DbContext. Mutually exclusive with Connection String |
| Database Initializer Type | String. Initialization strategy to synchronize the underlying database when the DbContext doesn't match the database. Values are 'CreateDatabaseIfNotExists', 'DropCreateDatabaseAlways', 'DropCreateDatabaseModelChanges', 'MigrateDatabaseToLatestVersion', and 'None'. For a primer on migration strategies, see Julie Lerman's excellent MSDN Magazine article Data Points : A Code First Migrations Mystery: Solved |
| Database Schema | String. The schema name for your database tables |
| Designer | |
| Grid Color | Color. The color for the dots that make up the design grid, should you choose to show them. |
| Grid Size | Integer. The spacing of the design grid dots. You'll want to use small numbers; the units are dictated by the Microsoft Modeling SDK, and are in tenths of inches. |
| Show Cascade Deletes | Boolean. If true, will display associations that cascade delete as dashed red lines, otherwise all associations will display as solid black lines. |
| Show Grid | Boolean. If true, will display a design grid that you can use to align your element nodes. |
| Show Warnings in Designer | Boolean. If true, will display warning glyphs with tooltips when model elements have non-fatal issues detected |
| Snap to Grid | Boolean. If true, element nodes will bind their top-left corners to a design grid dot, whether it's visible or not. |
| Warn On Missing Documentation | Boolean. If true, will generate warnings when summary documentation is missing for classes, properties and association ends. |
| Documentation | |
| Comment Detail | String. XML comment <Remarks> section |
| Comment Summary | String. XML comment <Summary> section |
| Entity Context | |
| DbSet Access | String. Code visibility for generated DbSet properties. Values are 'Internal' and 'Public'. |
| Entity Container Access | String. Code visibility for entity container. Values are 'Internal' and 'Public'. |
| Entity Container Name | String. Name of generated DbContext-derived class |
| Misc | |
| SqlServer Type | String. Value of ProviderManifestToken attribute, for optimization of runtime database type is known and unchanging. Values are 'None', 'SqlServer' (2008) and 'SqlServer2012'. For more information see DbProviderInfo.ProviderManifestToken Property. |
Things you’ll want to set first
There are a number of the designer properties you’ll want to set early, for various reasons:
- DbContext, Entity, Enum and Struct output directories
- Set these earlier rather than later. You don’t want to generate a whole bunch of files in the wrong place, although if you do it isn’t the end of the world … the tool will remove them when you change the directory target, or you can always move them manually.
- EntityFramework version and EntityFramework Package Version
- Setting these early on will ensure you get all the validations for the technology you’re targeting
- Generate Code on Save
- If you’re going to do a bunch of edits and save often (as you should!), you’ll speed things up by turning this off until you’re ready for it.
- Warn on Missing Documentation
- For when you know you’ll not by typing in the docs (like you shouold be doing, right?), leaving this on can flood you with warnings that hide messages you might otherwise really want to see.
Context Menu
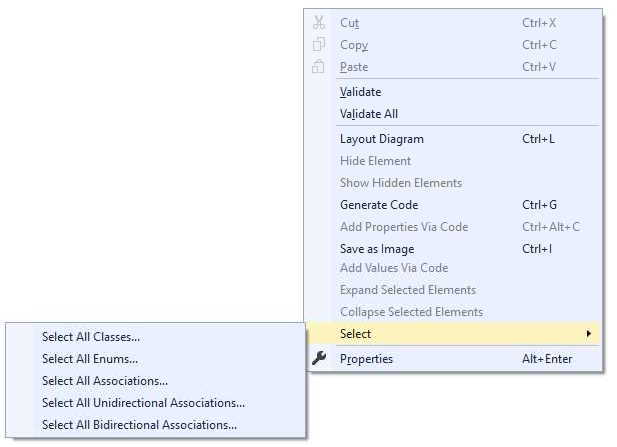
Right-clicking on the design surface displays a Visual Studio context menu with some new choices pertinent to the designer.
| Menu choice | Description | ||||||||||
|---|---|---|---|---|---|---|---|---|---|---|---|
| Cut, Copy, Paste | You can cut or copy, then paste, classes and enums. The pasted elements will be adjusted so that they don't violate any rules (such as two elements not having the same name), but otherwise the properties will stay the same. If no classes or enums are selected in the designer, the cut and copy options will be disabled. If no classes or enums are in the clipboard, the paste option will be disabled. | ||||||||||
| Validate | Checks the currently selected element (class, enum, etc.) against the validation rules built into the designer. Errors or warnings are displayed in Visual Studio's Error List window. If no element is selected, this validates all the elements, just like Validate All. | ||||||||||
| Validate All | Checks all model elements against the afore mentioned validation rules. Errors or warnings are displayed in Visual Studio's Error List window. | ||||||||||
| Layout Diagram | Arranges all model elements on the design surface. If no elements are in the designer, this option will be disabled. Note that this is the stock "Layout Diagram" behavior for Visual Studio's Modeling SDK, so you could almost certainly do a better job by hand. | ||||||||||
| Hide Elements | Hides the currently selected classes and/or enums on the diagram. Any lines to or from that element will be hidden as well. This does not remove the element from the model, only makes it invisible in the diagram. Useful for tidying up a diagram that would otherwise be unreadable due to, for example, a common base class that all other classes inherit from. If no element is selected, this option will be disabled. | ||||||||||
| Show Hidden Elements | Unhides any elements that were previously hidden, along with their association or inheritance lines. If no elements are hidden, this option will be disabled. | ||||||||||
| Generate Code | Generates code for the elements modeled in the designer. If no elements are in the designer, this option will be disabled. | ||||||||||
| Add properties via Code | Displays a dialog that lets you add multiple properties using the designer's custom property syntax. See "Adding properties via code" for more details. | ||||||||||
| Save as Image | Creates an image (bmp/gif/jpg/png/tiff/wmf) file of the designer and lets you save it as a file. If no elements are in the designer, this option will be disabled. | ||||||||||
| Expand Selected Elements | Will expand any selected classes or enums that are collapsed back to their full height. If none selected or none of the selected items are collapsed, this option will be disabled. | ||||||||||
| Collapse Selected Elements | Will collapse down to the title bar any selected classes or enums that are full height. If none selected or all of the selected items are collapsed, this option will be disabled. | ||||||||||
| Select | One of the features of the Visual Studio property editor is the ability to edit properties of multiple items if they share that property. This submenu gives you the ability to select model elements by type so that you can conveniently edit properties of those elements together (e.g., setting the color of multiple classes all at once). If the pertinent element type isn't present in the designer, that option will be disabled.
| ||||||||||
| Properties | Switches focus to the Properties window. |
Selecting Design Elements
You can select design elements from the visual designer, and their properties will appear in the standard Visual Studio property editor window. You’re able to select classes, their attributes and associations, enumerations and their values, comments, and lines connecting any model element; each has its own properties to display. Clicking onto the background of the designer will de-select any elements on it and show the properties of the designer itself.
Double-clicking an element, however, will take you to the code that you’ve generated for that element, if it exists. If it doesn’t, you’ll be asked if you want to generate the code, then you’ll go there.
The Entity Model Explorer Window
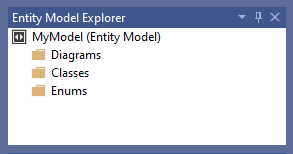
When you have a design surface open, Visual Studio will give you a new window under View / Other Windows / Entity Model Explorer. It’s a tree view of the diagrams, classes and enumerations in your model.
Selecting any class will show you the attributes of that class, as well as selecting that element on the design surface and displaying its properties in Visual Studio’s property window. Perfect for those too big models where you have to zoom out to see the whole picture but then can’t find anything because the text is too small to read.
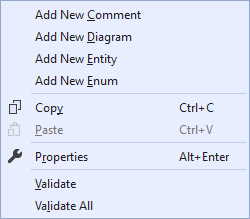
You can add elements here as well by right-clicking the top tree node (with the name of your model) and selecting one of the menu choices.
Diagrams
On the topic of too-big models, you can now add multiple diagrams to your model (as of version 2.0). The diagrams are views on the model data, and can display any subset of your model to help create a laser focus on those things you want to see without the clutter of the rest of the elements.
Add a diagram by right-clicking the model explorer and selecting (oddly enough) “Add New Diagram”. You’ll get an empty design surface with a default name that you can change in the Property window.
We’ll go into more details of diagrams later.
Generating Code
Once you have your model the way you want it (and we’ll talk how to do that during the rest of this documentation), you can generate the code in one of three ways:
- If you’ve set the
Generate Code On Saveproperty of the design surface totrue, just save the file - At any time, you can right click the design surface and choose
Generate Codefrom the context menu - As with any T4 file, you can always right click the
[Model Name].ttfile in your project and chooseRun Custom Toolfrom the context menu
Note: if you haven’t set up target project directories for your files, they’ll be dropped in the same directory
that contains your .csproj file. Unfortunately, when that happens Visual Studio tries to be “helpful” and tucks them
under the .tt file in the Solution Explorer tree, so you may not realize that they’ve been created. It’s a good practice
to create a subdirectory for them and target the output there. Minimally setting the Entity Output Directory
property on the design surface will default all the other output directories, and you’ll get visual confirmation in the
Solution Explorer tree when you generate your code files.